The short answer: install a teleprompter app that records video, mount the iPhone at eye level, and place a narrow column of large text as close to the front camera as the app allows. Record a 30-second test before the full take. Adjust the text layout first and the scroll speed second.
An iPhone can display a scrolling script over the camera preview while recording a clean video. Starting the recording is the easy part. The real challenge is keeping your gaze steady and your voice conversational while the words continue moving.
Most obvious “teleprompter eyes” come from geometry. A long line makes your eyes travel across the screen, and text far from the lens makes you appear to look past the viewer. The fix is usually a narrower reading area, a slightly larger font and a comfortable distance from the phone—not more rehearsal at an awkward setup.
If you are new to the subject, the companion guide explains what a teleprompter is and how it works. This guide focuses on one practical job: recording yourself with an iPhone.
Can you use an iPhone as both teleprompter and camera?
Yes. A recording teleprompter app can show the script over a live camera preview while capturing video on the same iPhone. For a one-phone setup, the front camera is the practical choice: you can see the words and frame yourself while the lens faces you.
This setup works well for talking-head videos, Reels, Shorts, course lessons, product updates and other direct-to-camera recordings. It is quick, portable and easy to run alone. The compromise is that the front camera sits at the edge of the screen rather than behind the text, so a very tight close-up can reveal a small difference in eye line.
If you need perfectly centered eye contact, use a physical beam-splitter teleprompter. One device displays the script while a separate camera—such as a second iPhone using its rear camera—records through the glass. That takes longer to assemble, but the reflected words appear directly over the lens.
What you need before you record
- An iPhone with enough free storage. Longer takes and higher resolutions create larger files.
- A teleprompter app that can record video. The app should let you change text size, margins, line spacing and scroll speed independently.
- A stable mount or tripod. Holding the phone makes it harder to keep a consistent eye line and framing.
- A script written for speaking. Short sentences and deliberate paragraph breaks are easier to deliver than dense page copy.
- Simple light and clear sound. Face a window or use a soft light, and place the phone close enough for the built-in microphone to capture a clear voice.
You do not need a ring light, a wireless microphone and a professional rig to make the first useful test. Start with the phone, a mount and 30 seconds of text. Add equipment only after the playback reveals a specific problem.
How to use a teleprompter on iPhone: seven steps
1. Turn the script into spoken language
Paste the script into your teleprompter app, then read it aloud once without recording. Shorten any sentence that forces you to rush the ending. Replace formal phrases with words you actually use. Contractions such as “you’re” and “it’s” often sound more natural than their written-out forms.
Keep one idea in each paragraph. A paragraph break is not only formatting; it tells your eyes and voice that a new thought is beginning. In Sufle, you can create or paste a script and check its word count and estimated reading time before opening the camera. For a full writing method and template, see how to write a teleprompter script that sounds natural.
2. Choose the final video orientation
Use portrait for Reels, TikTok, Shorts and other vertical platforms. Use landscape for most YouTube videos, course lessons and presentations. Decide before you frame the shot, then lock the orientation so the interface does not rotate when you adjust the mount.
3. Mount the iPhone at eye level
Place the phone so the front camera is level with your eyes, not on a desk below your face. Stand or sit far enough away that you can see the full frame without leaning toward the words. As the camera moves farther away, the small distance between the lens and the text becomes less noticeable.
Use the front camera when the same iPhone is prompting and recording. If you want to record with the rear camera, use a separate display or a beam-splitter rig; otherwise the script screen will face away from you.
4. Set the reading area before the speed
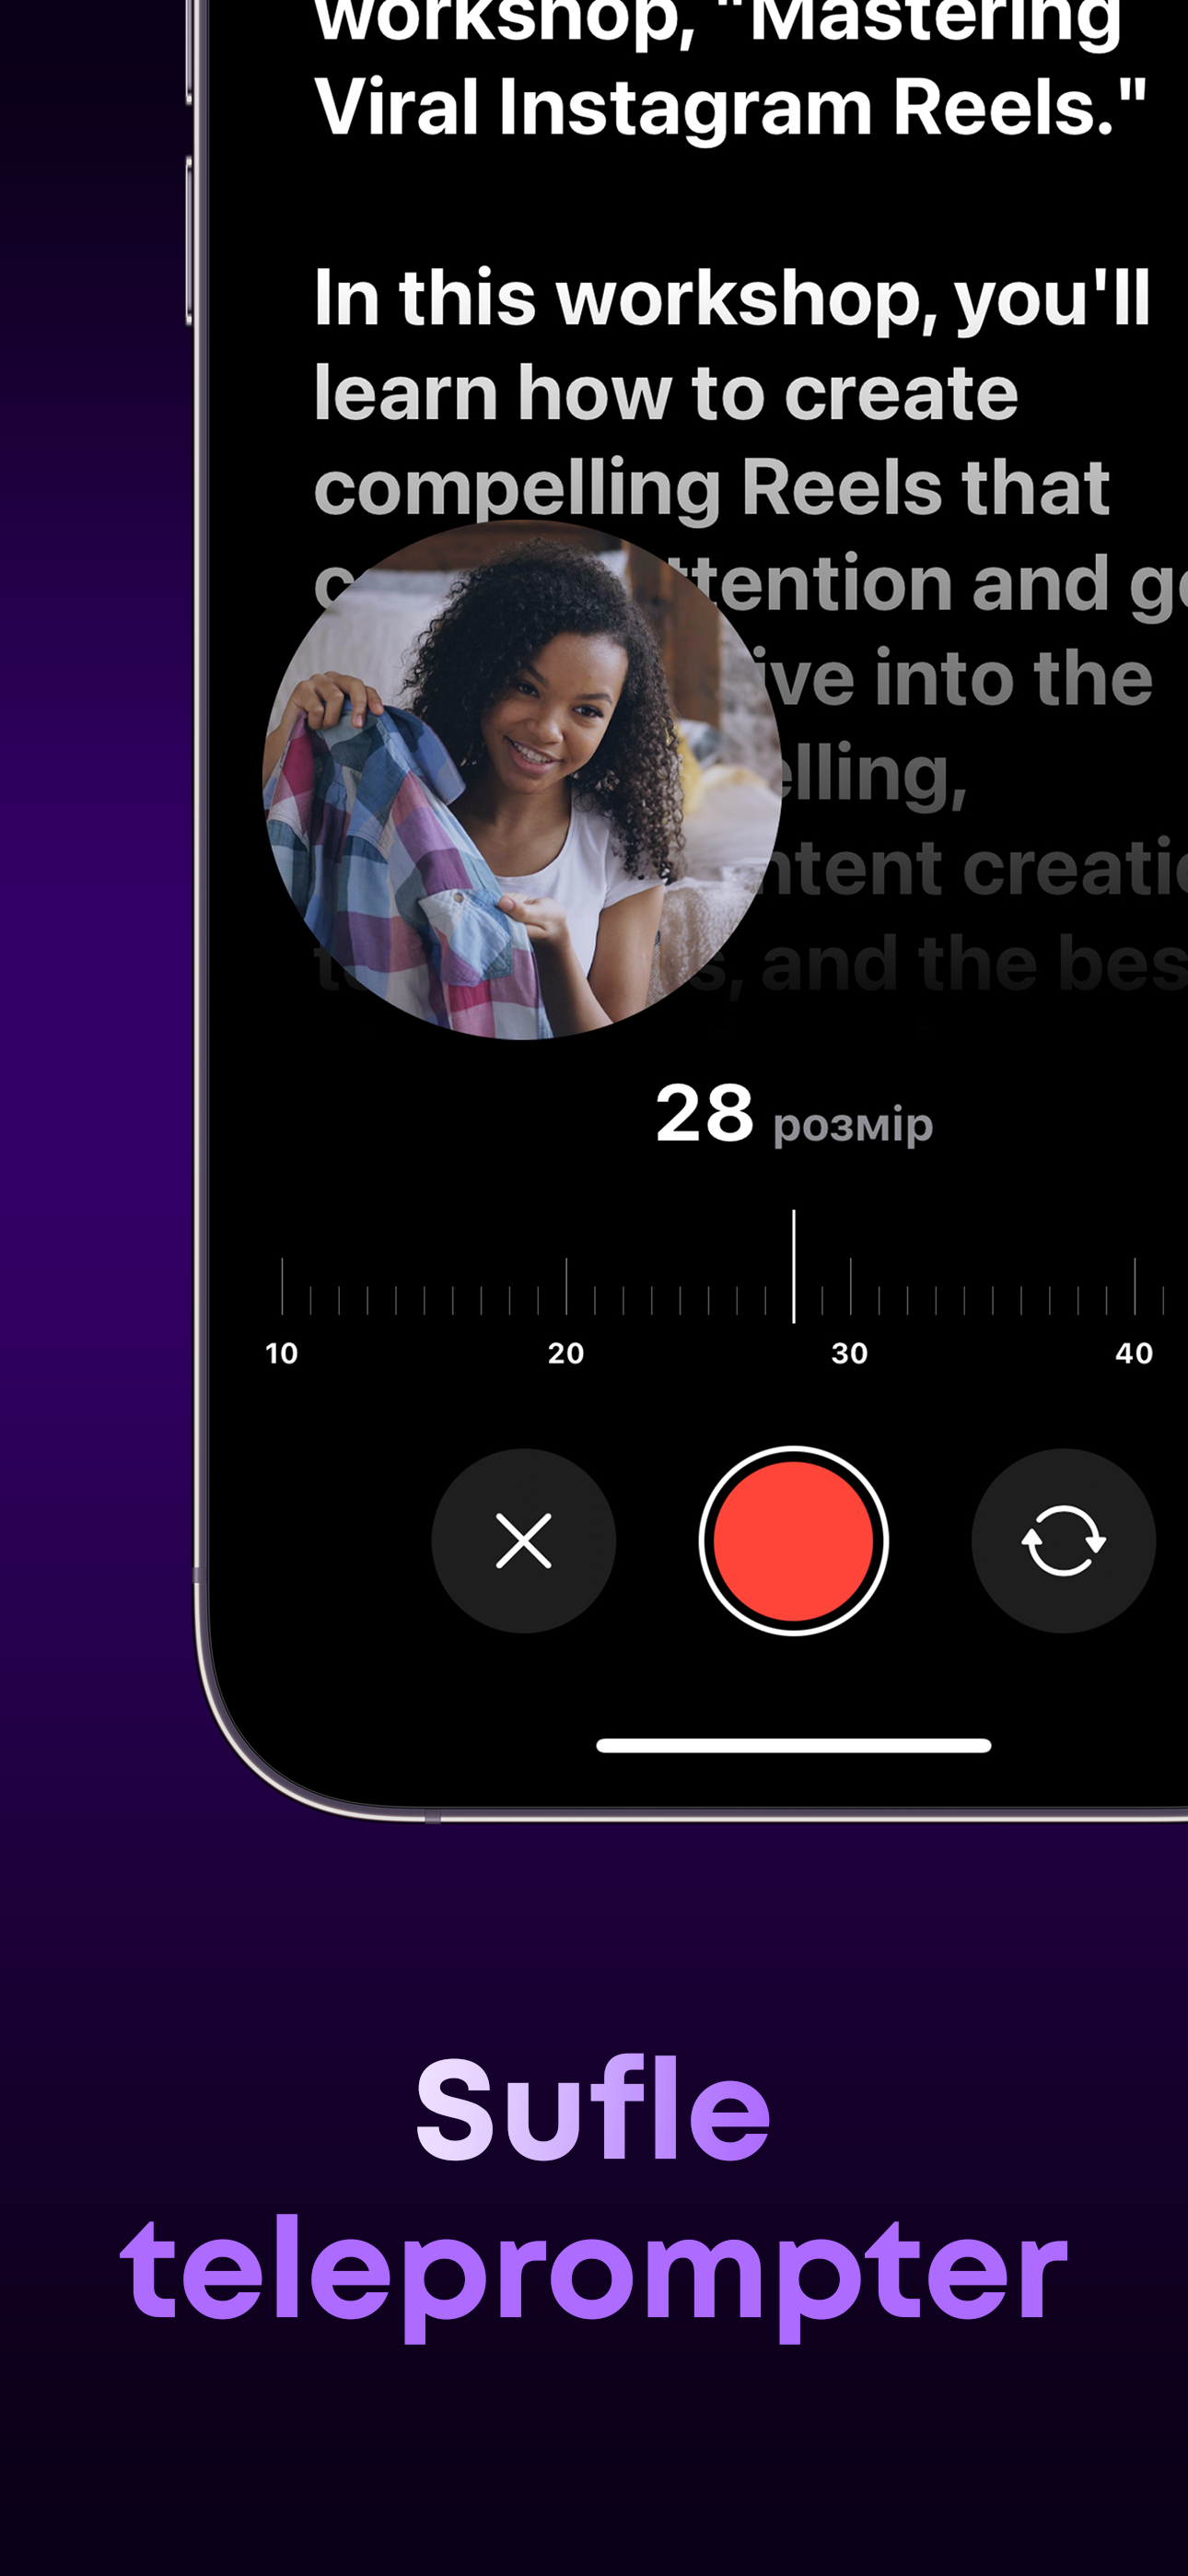
Increase the font until it is easy to read with a relaxed face. Then add horizontal padding so each line contains only a short phrase. Finally, set enough line spacing to keep the current line distinct from the ones around it. A narrow column near the camera produces less side-to-side eye movement than small text spread across the full display.
Developer’s note
In Sufle, padding and scroll speed are separate controls because they correct different problems. Padding changes how far your eyes travel; speed changes the rhythm of the delivery. If a close-up looks like reading, I would narrow the lines before changing the pace.
5. Find the pace with a 30-second test
Start speaking at your normal pace and let the scroll follow you. The next phrase should arrive just before you need it. If you hurry the end of every sentence, slow the text down. If you keep waiting for the next line, speed it up slightly.
There is no universal “best” number. A familiar introduction, a technical explanation and an emotional story all need different timing. The goal is not to match the scroll perfectly; it is to leave enough room for emphasis and pauses.
6. Set the countdown and recording format
A five-second countdown is a useful starting point. It gives you time to remove your hand from the phone, settle your expression and look into the lens before speaking. In Sufle, the countdown can be set to 3, 5 or 8 seconds.
For most talking-head videos, 1080p is a sensible balance between quality, editing speed and file size. Use 4K when you expect to crop the frame or need extra detail and have enough storage. H.264 is the safer choice for broad compatibility; HEVC usually creates smaller files but may require a newer editing workflow. Apple’s iPhone camera settings guide explains the recording options available in iOS.
7. Review the eyes and voice separately
Watch the test once with the sound off. Look for side-to-side eye movement, downward glances and changes in posture at paragraph breaks. Then listen without watching. Notice rushed endings, repeated emphasis and phrases you would never say in conversation.
Change one thing at a time. If the eyes move too much, adjust the text layout. If the voice sounds flat, rewrite the script or change the speed. Changing everything together makes it difficult to learn which correction worked.
Two ways to use an iPhone teleprompter
| Setup | Best for | Main advantage | Trade-off |
|---|---|---|---|
| One iPhone, front camera | Solo videos, social posts, lessons and quick updates | Fastest setup; one device prompts and records | Eye line can look slightly offset in a tight close-up |
| iPhone display with beam-splitter glass | Interviews, courses, client work and close framing | Reflected text appears directly over the camera lens | Needs a rig, a camera and mirrored text |
Start with the one-phone setup unless a tight close-up requires direct lens alignment. The same teleprompter app can remain useful later: Sufle supports mirrored text and orientation controls for a physical rig.
Recommended starting settings
Treat these as a starting point, not a preset that must work for everyone:
- Camera: front camera for a same-phone recording.
- Resolution: 1080p for most videos; 4K when cropping or fine detail matters.
- Orientation: match the final platform and lock it before recording.
- Text size: large enough to read without squinting or leaning forward.
- Horizontal padding: enough to keep each line to one short phrase.
- Line spacing: wide enough that you never confuse the current line with the next one.
- Scroll speed: set from a spoken test, not from watching silent text.
- Countdown: five seconds for a comfortable hands-off start.
Mirroring the front-camera preview is a matter of familiarity: some people prefer the view they recognize from the mirror, while others prefer the saved framing. It does not correct eye contact. Text position, line width and camera distance do.
How to read a teleprompter without looking like you’re reading
Natural delivery is not the absence of a script. It is the feeling that the speaker understands the thought before saying it. These habits make the biggest difference:
- Pick up a phrase ahead. Read a short group of words, then say the idea to the lens instead of chasing one word at a time.
- Keep lines short and close to the camera. This limits visible eye movement and makes it easier to scan phrases.
- Write the way you speak. If you would not say a sentence to one person across a table, rewrite it.
- Memorize the first and last line. You can begin with a steady look into the lens and finish without glancing after the final word.
- Let punctuation create pauses. Do not speed through a period because the next line is already visible.
- Move normally. Small gestures and changes in expression help the performance feel like communication rather than recitation.
- Record in sections. A clean 60-second segment is often easier to deliver and edit than one perfect ten-minute take.
It is also fine to change a word during the take. If the meaning stays accurate and the sentence sounds more like you, continue speaking. Trying to reproduce every syllable exactly can make a conversational script feel rigid.
Common iPhone teleprompter problems and fixes
| What you notice | Likely cause | What to change |
|---|---|---|
| Eyes sweep from side to side | Lines are too wide | Increase horizontal padding and use a larger font |
| You look below the viewer | Phone is too low or text sits far from the lens | Raise the mount and move the reading area toward the camera |
| Voice sounds flat | Page-style script or a pace that leaves no room to think | Shorten sentences, add pauses and slow the scroll slightly |
| You keep losing the line | Dense paragraphs or tight line spacing | Add paragraph breaks and increase spacing |
| The start of the take is awkward | You are reaching for the record control | Use a countdown or control the phone from a second device |
| Eye line offset remains visible | The framing is too tight for a screen-edge camera | Move the iPhone farther away and reframe, or use beam-splitter glass |
Using a second iPhone or iPad as a remote
A remote helps when the recording iPhone is across the room or mounted where touching it would disturb the shot. Sufle can connect two iPhones or iPads over the same Wi-Fi network or personal hotspot.
- Open Sufle on both devices and allow Local Network access.
- Start the teleprompter on the primary iPhone and tap the Wi-Fi button to display its PIN.
- Open the Remote tab on the second iPhone or iPad and enter that PIN.
- Use the second device to play or pause the text and to start, pause, resume or stop recording.
The connection stays on the local network. Keep both devices on the same Wi-Fi or hotspot during the take.
Record on iPhone
Try your script with Sufle
Adjust the reading area, pace and camera settings, then record clean video with the words kept close to the lens.
Common questions about iPhone teleprompters
Can an iPhone record video while showing a teleprompter?
Yes. A recording teleprompter app can place scrolling text over the camera preview while the iPhone records the video. In Sufle, the interface text is not burned into the saved recording.
Should I use the front or rear iPhone camera?
Use the front camera when one iPhone is both the teleprompter and recorder, because you need to face the display to read. Use the rear camera when a separate device or beam-splitter teleprompter provides the script.
What is the best teleprompter speed?
There is no single best speed. Record 30 seconds at your natural speaking pace. The next phrase should appear just before you need it, while leaving time for punctuation and emphasis. Adjust the speed for each script rather than forcing every delivery into one setting.
Should I record in 1080p or 4K?
1080p is enough for most talking-head videos and creates more manageable files. Choose 4K when you need room to crop, want extra detail or are matching other 4K footage. Make sure the device, available storage and editing workflow support it.
Will the script appear in the final video?
Not when the app records the script as an interface overlay rather than part of the camera image. Sufle saves a clean video without the scrolling words.
Build the setup around your eyes, not the screen
The most convincing iPhone teleprompter setup is rarely the one with the most text visible. Keep the phone at eye level, make the reading column narrow, and let one short phrase arrive at a time. Then set the speed from your voice instead of allowing the moving words to dictate it.
Begin with a 30-second script and review the playback once for eye movement and once for delivery. If the eyes wander, change the layout. If the voice sounds read, change the words or the pace. Once those two parts feel natural, the same setup can scale from a short social post to a complete lesson or presentation.